Did you know that you can replace wheat flour with rice flour, especially if you have issues with gluten in wheat? Did you also know that you can make your own rice flour at home? well, allow me to tell you how. Rice flour is made from ground uncooked rice. It is gluten-free and can be used as a substitute for wheat flour in many recipes. Rice flour can be used to make cakes, cookies, bread, and muffins. In addition to baking, rice flour can also be used as a coating for fried foods, such as chicken or fish. Additionally, it can be used to make rice noodles, crackers, and other snacks as well as thickening agent in soups and sauces.

Rice flour varieties
Rice flour comes in two main varieties; white rice flour and brown rice flour. White rice flour is made from milled rice and has a milder taste and a lighter color than brown rice flour. Brown rice flour is made from whole grain rice and has a nuttier taste and a darker color. It also contains more nutrients than white rice flour. Rice flour can be used as a one-to-one substitute for wheat flour in many recipes, but because it lacks gluten, it may not provide the same structure and texture as wheat flour. To compensate for this, you may need to add additional binders such as eggs to help the mixture hold together. It is also important to note that since it is gluten free it can be a bit drier than wheat flour, so it may require a bit more moisture to get the desired consistency. Please note that rice flour should be stored in an airtight container. This is because it stores well in a dry, and cool place for it to last. It can also be stored in the refrigerator or freezer to extend its shelf life.
Why cook with rice flour
Well to start off rice flour is versatile compared to wheat flour; it can be used in a variety of recipes as mentioned above. Here are a few other reasons why you might choose to use rice flour over wheat flour:
- Gluten-free: Rice flour is gluten-free, making it a good option for those looking for healthier vegan options as well as those with gluten sensitivities.
- Brown rice flour contains more nutrients than white rice flour as it is made from whole-grain rice and it is rich in vitamins, minerals, and antioxidants. thus a healthier alternative.
- Rice flour has a mild and neutral flavor that can easily blend in with other ingredients and it can also enhance the taste of certain dishes.
- The textures of rice flour is to die for. Rice flour can create a light and delicate texture in pastries and cakes, it can also create a crispy crust when used as a coating for fried foods.
Useful tips when baking with rice flour
For better results in your cooking, here are a few tips that you need to know when using rice flour:
- Rice flour absorbs more liquid than wheat flour, so you may need to adjust the amount of liquid used in a recipe when substituting rice flour for wheat flour. You may be required to use more liquid or more eggs when baking with rice flour.
- Rice flour can be used as a thickening agent in soups, sauces and gravies; add a spoonful of rice flour to cold liquid and mix well before adding it to the hot mixture. Adding it a cold liquid ensures that it does not become lumpy.
- Rice flour should be stored in an airtight container in a cool, dry place. It can also be stored in the refrigerator or freezer to extend its shelf life.
- Don’t be afraid to experiment with rice flour and try new recipes. As you get more familiar with how it behaves and how it can be used in cooking, you’ll find it easier to work with and adapt to your needs.
- The finer the better. Keep in mind that homemade rice flour may not be as fine as store-bought rice flour and may also have a slightly different texture, especially if you do not use good equipment, but it can still be used in a variety of recipes.
How to make rice flour at home
Step one:
Making rice flour at home is relatively simple and can be done using a blender or a food processor. To start with, select the type of rice you want to use. You can use either white or brown rice. Wash the rice by rinsing it n a fine mesh strainer under running water to remove any dirt.
Step two:
Dry the rice by spreading it out on a large sheet or plate and let it dry for about an hour to remove any excess moisture. Excess moisture may affect the final texture of the flour. Once the rice is dry, place it in a blender or food processor and pulse it on high speed until it becomes a fine powder. You can also grind the rice in a spice or a mill if you have one, this will make the process quicker and the flour more fine. This may be a labour of love and my quick advice is that be patient and trust the process because this may take several minutes.
Step three:
Sift the processed flour through a fine mesh strainer to remove any larger pieces or clumps before transferring the flour to an airtight container. Store is in a dry and cool place. You can also store it in the refrigerator or freezer to extend its shelf life.
Below is a rice flour recipe that you can try at home:
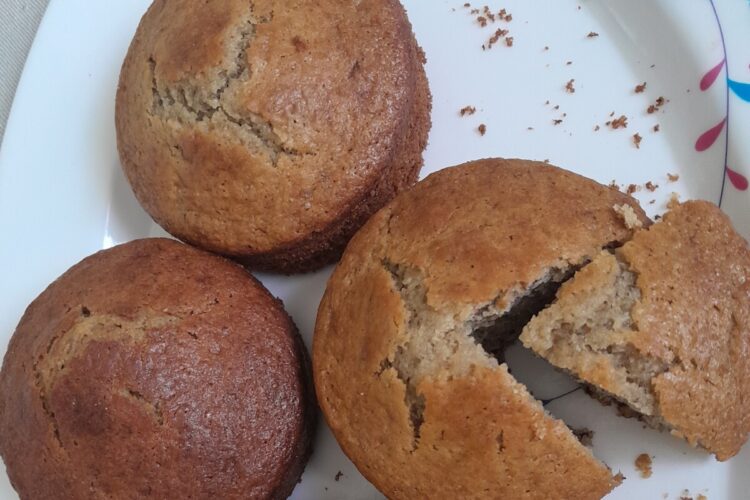
Gluten-free banana rice muffin recipe

Ingredients:
- 2 cups rice flour; you can also use 1 cup rice flour and 1 cup all-purpose flour
- 1 teaspoon baking powder
- 1 teaspoon baking soda
- 3 ripe bananas mashed
- 3 eggs
- 1/2 cup milk
- 1/2 cup sugar
- 1/2 teaspoon nutmeg
- 1/2 teaspoon salt
- 3/4 cup melted butter/margarine
- Zest of 1 lemon
- 1 tablespoon lemon juice
Instructions:
Prepare the oven and the baking tin for the muffins by pre-heating the oven to 180°c and greasing the muffin tin or lining the tins with muffin liners.
Combine all the dry ingredients together in one bowl and mix them well. In another bowl, whisk together sugar, eggs, melted butter/margarine, milk, lemon juice and the mashed bananas. Mix the dry ingredients with the egg mixture and mix using a spatula. Add the lemon zest then mix slightly ensuring that you do not overmix the butter. You can correct the consistency of the butter by adding more milk or water.
Once the batter in ready scoop and fill the muffin cups ensuring that you do not fill to the top; leave enough space on top to allow room for the rise. I recommend that you fill upto 2/3 of the muffin cup
Once done, put your muffins into the oven and bake at 180°c for about 20 minutes or until the test for doneness is positive.
Enjoy with a cup of tea or coffee or as a snack.
Get recipe card here